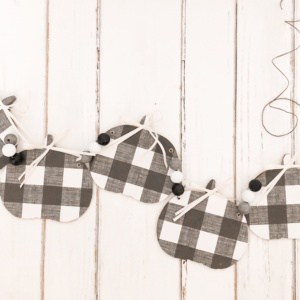
Buffalo check is the perfect fall farmhouse print! Find out how you can repurpose Dollar Tree fall decor to make you own farmhouse-ready buffalo check banner.
Hey buddies!
Last week I posted my first post in a round of Fall DIYs I have planned this season…a $5 Buffalo Check Wreath! You guys love the buffalo check! (Who doesn’t??) So I’m back for round two with a buffalo check banner…using fall decor from Dollar Tree!
Keep reading to see how you can repurpose some Dollar Tree fall decor to make your own fall farmhousey buffalo check banner!
Buffalo Check Banner: Supplies and Costs
*Disregard the beads in the top photo…I got the wrong ones! Those only had a hole in one side. The ones below are the ones I used.
- 2 football+pumpkin banners: $1 each (Dollar Tree)
- Buffalo check scrapbook paper: 4/$1 (Hobby Lobby)
- 2 packages of round wooden beads: $2 each (Hobby Lobby) *use 40% off coupon on 1 package for a total of $3.20
Total Cost: $6.20
*Other supplies you may need: Mod Podge, acrylic/chalk/spray paint, twine, raffia (optional)
How-To: Buffalo Check Banner
Step 1: Remove Pumpkins from Ribbon
The wooden pumpkins and footballs from Dollar Tree are stapled to a ribbon. Remove the pumpkins from the ribbon (and save the footballs for another fun project!), and make sure the staples are out of the wooden shapes. Don’t worry about the front of the pumpkin…we’ll only be using the backs!
Step 2: Trace Pumpkins on Buffalo Check Paper
Trace your pumpkins on the buffalo check scrapbook paper…make sure your paper and pumpkins are facing the right direction! I numbered my pumpkins and paper because the OCD in me was afraid that each pumpkin wasn’t exactly the same. Ahhhh! In hindsight, this step was pretty unnecessary.
Step 3: Mod Podge Pumpkins
Now it’s time to Mod Podge the buffalo check scrapbook paper to the backs of the pumpkins. If you have never Mod Podged before, it’s super simple!
1.Use a foam brush to apply a thin layer of Mod Podge to the wooden pumpkin.
2. Carefully lay the scrapbook paper on top, making sure the edges match up. If there are any air bubbles, carefully smooth them out.
3. Then apply a thin layer of Mod Podge on top of the scrapbook paper….yes, it will look white, but it will dry clear.
4. Repeat these steps for all the pumpkins.
5. After your pumpkins are completely dry (it shouldn’t take long..especially with a fan on), apply another thin layer of Mod Podge on top of each pumpkin.
6. You can apply as many coats of Mod Podge as you feel necessary, but be sure to let each coat dry before applying another one.
Step 4: Paint Wooden Beads
I chose gray, black, and white paint for mine to match the colors of the buffalo check print. As far as paint, use whatever you have on hand. Acrylic paint will work, as will chalk paint or spray paint.
Step 5: String Together
Ok, so I know you’re going to ask: “How do you string the pumpkins on the twine?”
Well, I drilled holes on the edges of mine….but that’s wayyyyyyy unusual for me. I was feeling extra that day. Normally I would just hot glue them to the twine, which is totally acceptable if you don’t have a drill.
Because of the number of beads I had, I only used 5 out of the 6 pumpkins.
*Bonus* Step 6: Add Raffia or Twine
As I said, I was feeling a little extra when I made this…so I added some raffia to the pumpkins as a finishing touch. I just felt like it needed something, ya know? I used raffia because that’s what I had on hand, but ribbon or twine would look great as well!
DIY Buffalo Check Banner
There you have it! A buffalo check banner…for just around $6! I love me some farmhouse decor…and this buffalo check banner is the perfect addition to our modern fall farmhouse!
As always, I love seeing your takes on these little DIYs. If you post on Instagram, be sure and tag me (@herhappyhome) with your own version of this buffalo check banner!
And don’t forget to follow me on Pinterest for tons of fall decor inspo!


Leave a Reply