DIY Dollar Store Buffalo Check Wreath
Have you jumped on the buffalo check train? Find out how you can make your own buffalo check wreath in less than 30 minutes…for just $5!
Hi friends! And welcome to my first post of my “Fall DIY” series. I love the fall season so much, especially the fun decor, and I’m excited to share some of the easy, inexpensive “modern farmhouse” decor I incorporate into our home this season!
Yippy!
Of course I’m jumping on the buffalo check train…how can I not?? It’s the perfect farmhousey print, and it easily transitions to other seasons or even everyday decor!
I love a good DIY wreath, and this buffalo check wreath is the perfect intro into the fall season.
Read on to see how to make your own buffalo check wreath in less than 30 minutes…for just around $5.

Related: Chalk Painted Thrift Store Pumpkins
Buffalo Check Wreath: Supplies and Costs
This post may contain affiliate links, at no extra cost to you. To read my affiliate disclosure, click here.
The great thing about this buffalo check wreath is it takes minimal supplies to make!
Most of the items can be found at Dollar Tree, with the exception of the fabric and the specific greenery I chose….which still comes in at a dollar store price.


- Foam wreath form: $1 (Dollar Tree)
- Set of 3 pumpkin clips: $1 (Dollar Tree)
- Burlap ribbon: $1 (Dollar Tree)
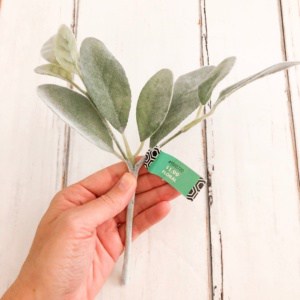
- Lamb’s ear greenery stem: $1.20 after 40% off coupon applied (Hobby Lobby)
- I like to buy lamb’s ear in bulk on Amazon, because it’s just the perfect fall accent for so many things! Plus, the price is always right on Amazon!
- Buffalo check fabric: $1.16 (The buffalo check fabric is $7/yard at Hobby Lobby, but 6 inches is all you need for this project)
Total cost: $5.36
*Other supplies you may need: hot glue gun, chalk/spray paint
How-To: $5 Buffalo Check Wreath
Step 1: Cut Fabric
This is a small wreath, so it doesn’t take much fabric at all.
Take the buffalo check fabric and cut it into strips…mine were about 3″ wide and I used 4 strips.

Step 2: Wrap the Wreath Form
Start with 1 strip of your buffalo check fabric and hot glue the end of it on the wreath. Then slowly start wrapping your fabric around the wreath, hot gluing the end to the wreath when you get to it.
Hot glue the beginning of your 2nd strip where the 1st one ended and repeat this process until the entire wreath is covered.
Mine took 4 strips exactly, but you may need more or less depending on the width of your fabric strips.

Related: Dollar Tree Buffalo Check Banner
Step 3: Add the Stems
Ahhh, isn’t lamb’s ear so pretty? It’s my favorite…and apparently everyone else’s too! It can be hard to find at Hobby Lobby this time of year, but luckily you can get a great price on lamb’s ear on Amazon! If you are able to find some at your local craft store, this little stem is all you need for this wreath.
Cut the stems off of the “main stem” so you can arrange them more easily on your buffalo check wreath.
Then hot glue them on the wreath, facing both ways.


Step 4: Add the Pumpkins
The pumpkin clips come in orange, but they’re very easy to paint if you want a different color (this can also be done in the very beginning).
Spray paint or chalk paint both work well.
Once your pumpkins are dry (if you choose to paint them), just clip them to the middle of the stems so that they form a cluster. I actually clipped them on the stems.


*Bonus* Step 5: Add a Burlap “Bow”
Now you can totally be done after step 4…it still looks beautiful! But I felt like mine “needed” a little something extra, so I added the burlap ribbon.
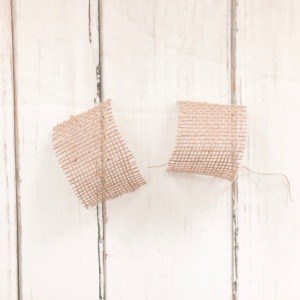
To do this, I cut two small pieces and formed each one into a loop. I then hot glued the ends together to hold the loop (see the second picture).
After that, I added a little more hot glue to the end of the loop and sort of just “jabbed” it where I wanted it to go. I did the same thing for the second loop, giving it the illusion of a bow.


Related: DIY Dollar Tree Fall Frames w/Free Printables
DIY $5 Buffalo Check Wreath
$5 and 30 minutes later, this beauty is finished! I currently have mine hanging on our pantry door, and it adds the perfect little fall touch to our kitchen.
Love, love, LOVE!


I so hope you’ve enjoyed this little tutorial, and I’d love to see your version of this easy buffalo check wreath! I’d love for you to tag (and follow!) me on Instagram (@herhappyhome) with your very own buffalo check wreath!
For more easy fall DIYs, check out the other posts in this series!
- Trash to Treasure: Chalk Painted Pumpkins
- DIY Dollar Tree Farmhouse Frames w/Free Printables
- Dollar Tree Buffalo Check Banner
- $2 Fall Farmhouse Sign
- DIY Wood Bead Wreath
Leave a Reply